Most coding tasks nowadays are fairly well supported and documented and if you get into trouble you can usually do a Google search, open Stackoverflow and find a bit of help if you dedicate enough time. However, blockchain and all connected technologies are relatively new, change rapidly every day and the supporting infrastructure is just not what we are used to with other more “traditional” development projects. Just to give an example, there are many test networks you can use but most we found are fairly intermittent and I would say unpredictable at times so you will definitely feel at times that you need to experiment and cut your own path.
This guide is meant to provide help with that through a real project in which we are deploying a pre-existing Smart Contract and later connecting to and interacting with it. After deploying the pre-written smart contract we are able to add new stakeholders, vote and transfer funds as well.
Tools required:
The goal of this tutorial is to deploy a smart contract to the Ethereum blockchain. Writing the contract itself is out of scope, we will use the code of an existing contract which can be found here:
https://github.com/Canecom/blockchain-open-to-public-/blob/main/PaymentDistributor.sol
Steps of deployment:
- Open the Remix IDE in your browser. You should use the browser in which the MetaMask plugin is installed.
- On the File Explorers tab create a new file in the default workspace, name it to PaymentDistributor.sol
- Copy the code of the contract from github and paste it to the PaymentDistributor.sol file inside remix. Save the changes by pressing CMD+S. At this point your screen should look something like this:

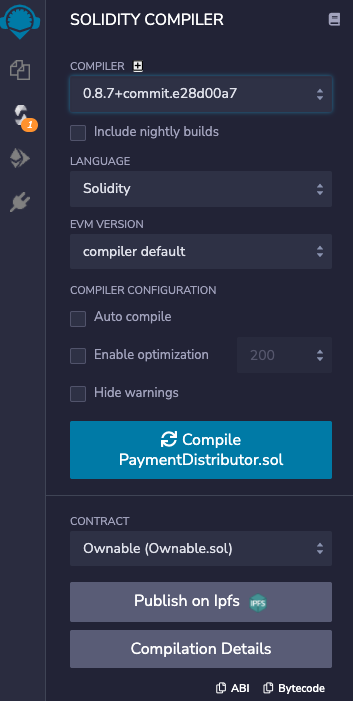
- Next, the contract should be compiled.
- To do this switch to the Solidity Compiler tab in Remix.
- Select the appropriate version of Solidity compiler from the topmost dropdown. In our example this should be the version 0.8.7.
- Once this is done click on the Compile PaymentDistributor.sol button. In case any error occurs it is displayed at the bottom of the Solidity Compiler tab, so if you don’t see any errors there you are probably fine.
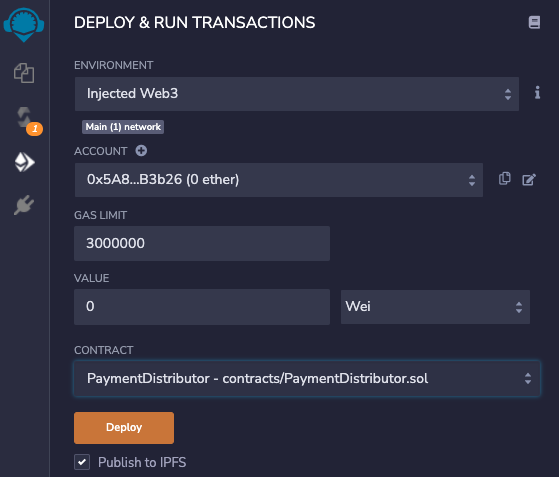
- The last step is to deploy the contract itself to the blockchain.
- First switch to the Deploy & run transactions tab in Remix.
- In the first dropdown select Injected Web3. In case you are logged in to MetaMask then the network that is currently active should be displayed under the dropdown. In case you are on the wrong network change it in Metamask and the change will be automatically reflected in Remix. For instance, for the main network, you should see this:
In case the actively selected network is not visible in Remix then you are probably not logged in to Metamask. In this case log in to Metamask first and then if you still don’t see the selected network in Remix you may have to reload it in your browser. Don’t worry, the code of the already copied (and saved) contract will be preserved, but you may have to recompile it again as described above. - Please make sure that in the contract dropdown above the Deploy button the PaymentDistributor contract is selected:
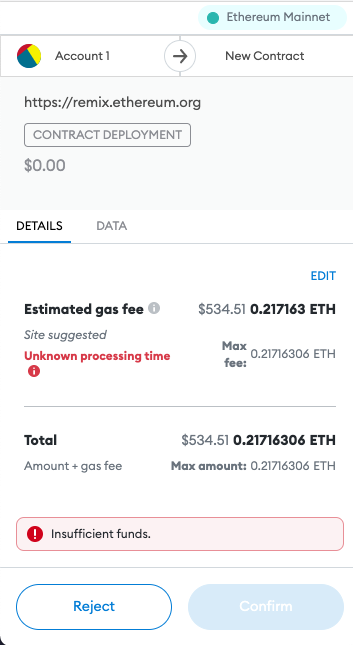
- When you are ready for deployment press the Deploy button. Metamask will present you with the estimated gas fee of the deployment, it will also tell you if your funds are insufficient for the deployment:
- After the deployment has been initiated please wait for the transaction to be mined. You will receive a notification from Metamask once the transaction has been accepted/rejected by the network.
- In case of successful deployment, the deployed contract will show up in the Deployed contract section at the bottom of the Deployment tab in remix.

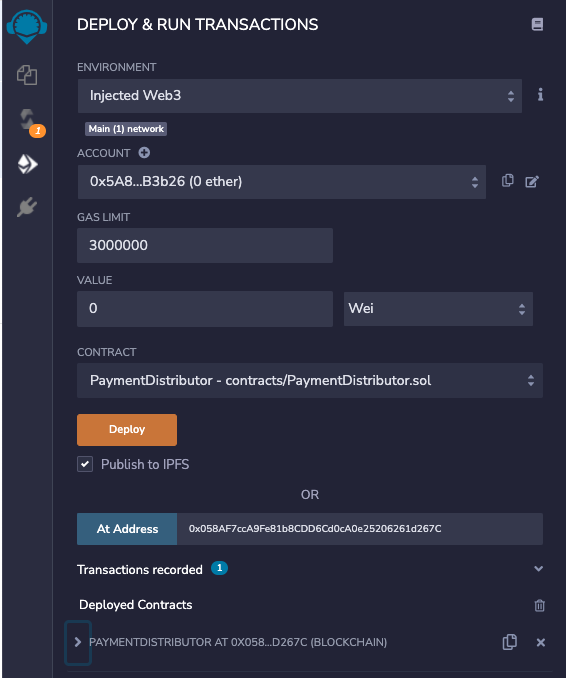
- It is advisable to copy and store the address of the contract for future reference. It is not a mandatory step, the contract address can be acquired by other methods later but sooner or later you will need it anyway.
Interacting with a deployed contract
Opening down the deployed contract in the Deployed Contracts section of remix reveals the available public functions of the contract. Each function is represented by a button. The buttons are color coded, orange buttons call functions that manipulate the state of the contract, blue buttons call readonly functions that are only getting information about the state.
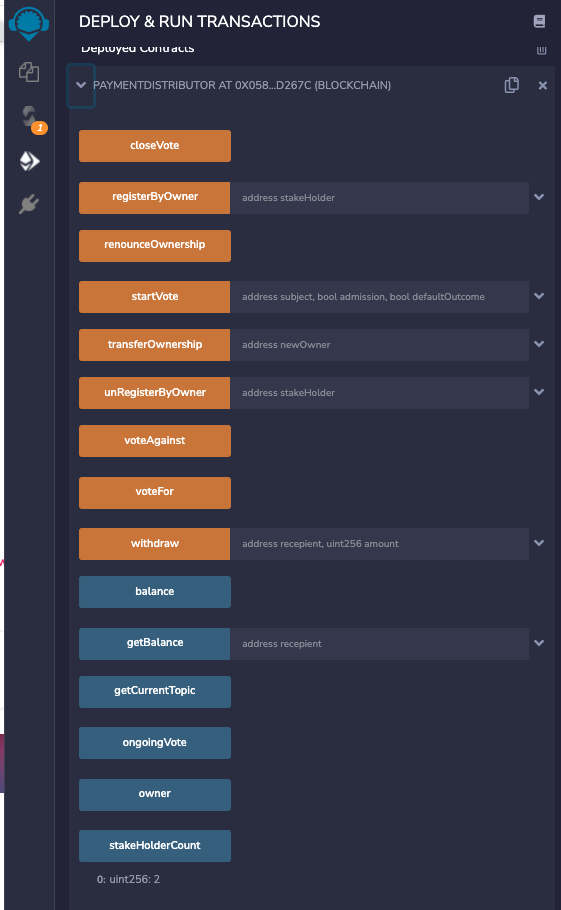
In case a function has parameters a textbox shows up next to its button. If a function has multiple parameters press the extend button next to the textbox to reveal the details:
Connecting to an already deployed contract
Once a contract is deployed to the blockchain it remains there forever. Of course you may want to interact with it later. In case you want to reconnect Remix to a contract deployed in the past do the following:
- First, you will still need the source code of the contract. The reason is that without the source code Remix has no way to know what functions the contract you are connecting to contains. So either open up the code that was saved earlier or create a new file with the source code as described in the Contract deployment section.
- Next, compile the code
- Switch to the Solidity Compiler tab in Remix.
- Select the appropriate version of Solidity compiler from the topmost dropdown. In this case select version 0.8.7.
- Once this is done click on the Compile PaymentDistributor.sol button
- Obtain the address of the deployed contract. You must have it saved somewhere if you followed the steps in the Contract deployment section. 🙂
- Use the address of the contract to reconnect:
- Switch to the Deploy & run transactions of the remix tool
- In the environment dropdown select ‘Injected Web3’
- In Metamask select the network where your contract is deployed
- In the Contract dropdown in Remix select PaymentDistributor.sol
- Copy the address of the contract next to the At Address button:
- Press the At Address button
- Your contract should show up in the Deployed contracts section


Using the PaymentDistributor smart contract
Adding stakeholders
The newly deployed contract has no stakeholders by default. There are two ways to add new stakeholders:
- The owner of the contract can add new stakeholders
- The owner can initiate a vote to add stakeholders, the existing stakeholders can vote on the outcome.
Both approaches has their on limitations:
- The owner can only add new stakeholders if the number of existing stakeholders is below 2.
- A vote can only be initiated if the number of existing stakeholders is equal or higher than 2.
Adding a stakeholder by the owner
- In the Deployed & run transactions tab in Remix select the contract you wish to interact with. In case there are no contracts showing up please refer to the Contract deployment and the Connecting to an already deployed contract sections of this tutorial.
- Locate the registerByOwner button
- Copy the blockchain address of the person you wish to add as a stakeholder in the textbox next to the button
- Press the registerByOwner button
- Once the transaction is successfully processed the contract should have a new stakeholder
- To verify this, locate the stakeHolderCount button and press it. It should return the following result:
0: uint256: 1
Here the last number is the important one, it indicates the number of current stakeholders.

Adding a stakeholder by vote
- In the Deployed & run transactions tab in Remix select the contract you wish to interact with. In case there are no contracts showing up please refer to the Contract deployment and the Connecting to an already deployed contract sections of this tutorial.
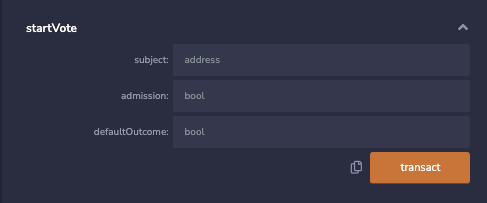
- Locate the startVote button
- Press the expand button on the right hand side to reveal all parameters

- Copy the blockchain address of the person you wish to add as a stakeholder in the subject textbox
- Write true to the admission textbox
- Set the default outcome according to your needs to true or false. The default outcome value comes handy when the voting is closed without any votes cast. In that case the default outcome will decide the voting, if it is true the new stake holder will be admitted, if it is false the stakeholder will not be admitted.
- Press the transact button
- Once the transaction is successfully completed the vote is in progress.
- You can verify this by clicking on the ongoingVote button, it should give the following result:
0: bool: true
True in this case means there is a vote in progress.
Closing a vote
A vote can be closed at any time by the contract owner. There can be two outcomes:
- In case the number of for votes are higher than the against votes then the subject of the vote will be admitted as a new stakeholder. The same happens if the defaultOutcome was set to true and there were no votes.
- In case the against votes win OR the default outcome was set to false and no votes were received then the admittance of the subject will be rejected.
To close a vote do the following:
- Locate the closeVote button
- Press the button
- Once the transaction is processed you can check the outcome using the stakeHolderCount button. If the count is higher than before then the vote was successful and the new stakeholder has been admitted, in case the count is the same as before then the admittance has been rejected.
Transferring funds to the contract
The main goal of the PaymentDistributor contract is to distribute incoming funds between stakeholders. The contract automatically distributes funds between stakeholders. To transfer ETH to the smart contract do the following steps:
- In the Deployed & run transactions tab in Remix select the contract you wish to send ETH to. In case there are no contracts showing up please refer to the Contract deployment and the Connecting to an already deployed contract sections of this tutorial.
- Define the amount you wish to send in the Value input between Gas limit and Contract:
- Scroll to the very bottom of the deployed contract and locate the Low level interactions part:


- Here leave the input blank and press the Transact button.
- Once the transaction is completed you can check the balance of the contract with the balance button:
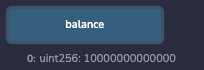
Here, the value after uint256: contains the balance of the contract in WEI.
This tutorial was written by Peter Neumann, Senior Full Stack Developer here at Canecom who is researching blockchain technologies since 2020. If you have questions regarding the tutorial or have a project idea you would like to discuss please get in touch with us.